Individual users are assigned to security groups and inherit the privileges of that security group. Users can be in multiple groups, in which case they inherit the 'highest' privileges of the combined groups.
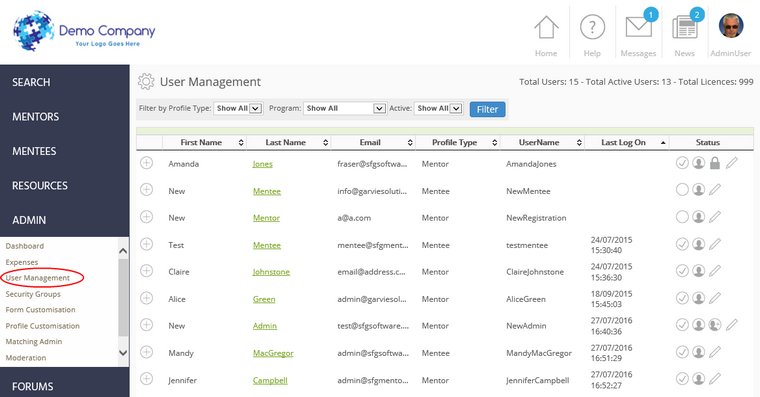
User Security is managed from within the Admin section:
To manage user security:
| 1. | Click on the Admin menu on the left side of the screen. |
| 2. | Click User Management: |
| 3. | This screen shows you a list of all users. You can sort the list by clicking on the column headers and you can filter the list by clicking on the filter drop-down boxes at the top. |
| 4. | The list shows a summary of user details, including their profile type (i.e. mentor user, mentee user, forum user), when the user last logged on, and their 'status'. The 'status' column shows icons as follows: |
| This shows whether the user is an active user or not. A tick represents an active user. |
| This shows whether the user has a user account. Users without a user account are not able to log in but exist within the system for all other purposes. Typically this might be appropriate for an organisation using MentorNet for face to face mentoring, where mentees are not expected to use the system. In that case the mentees can be set up on the system so that activity reports can be created against them, and the mentoring relationship can be tracked, but the mentee does not have a user account and therefore cannot log in. |
| This icon identifies the user as an administrator. |
| This icon identifies that the user account has been locked and needs to be unlocked by an administrator before the user can login. If a user enters his password incorrectly five times then the account will be locked. |
| 5. | Click Edit to edit the security privileges for a user. |
To edit user security:
| 1. | Click on the Admin menu on the left side of the screen. |
| 2. | Click User Management. |
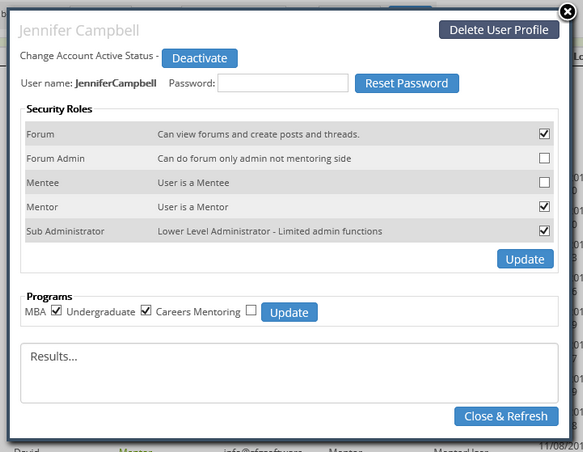
| 3. | Click Edit for the user whose security privileges you want to edit. This displays the following screen: |
To change a user's account status:
| 1. | To deactivate a user, click Deactivate. This does not delete the user or any content associated with the user; it merely makes the user inactive and the user will not be able to log in. |
| 2. | Once you have clicked Deactivate or Activate, you will be given the option of sending an email to the deactivated/activated user. Ensure the box is ticked if you wish an email sent. |
| 3. | Click Close & Refresh. |
To change a user's password:
| 1. | In most cases each user is able to reset his own password, but occasionally the administrator may have to reset a user password. |
| 2. | Type in the new password in the Password box and click Reset Password. |
| 3. | The new password will be emailed to the user. |
| 4. | Click Close & Refresh. |
To assign a user to a security group:
| 1. | The scrollable list under Security Roles gives a list of all the security groups that exist. The first column gives a title for the role and the second column gives a more detailed description of the group. |
| 2. | Tick or untick the box next to the security group that you want to change. Users can be in multiple security groups - the only exception to this is that a user cannot be a mentor and a mentee at the same time. |
| 3. | When you have finished making change for that user, click Update. You will see confirmation of your changes appear in the Results box below. |
| 4. | Click Close & Refresh. |