MentorNet allows administrators to add drop-down and check-box field types to the Profile page. This means, for example, that a user profile template can be defined such that a user is forced to enter text from a pre-defined drop-down list (e.g. a field of ‘Subject’ with possible values of ‘Maths’, ‘English’, ‘Accountancy’, ‘Engineering’, Languages’, etc).
This gives the administrator more control over user profile data that is entered and can help to structure information consistently, to make searches more effective.
To customise the Profile page:
| 1. | Click on the Admin menu on the left side of the screen. |
| 2. | Select Profile Customisation from the menu beneath: |
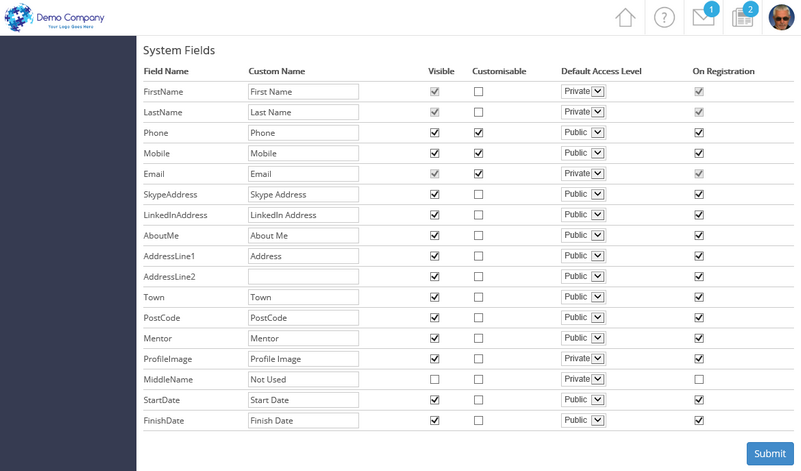
| 3. | There are two sections to this screen, as follows: System Fields - This section, in the lower part of the screen, contains a number of pre-defined 'system' fields. These give you examples of typical fields that you might want to use, to save you recreating commonly-used fields from scratch. You can amend the descriptions, choose whether or not to display them, and define who can see them. |

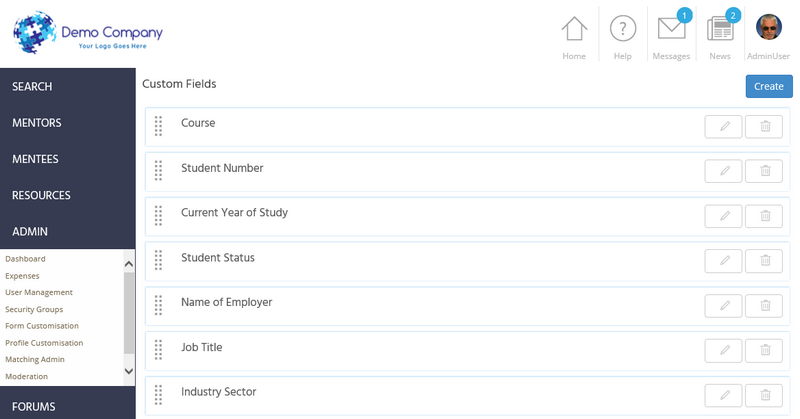
Custom Fields - This section, in the upper part of the screen allows you to add your own fields to the Profile page.

To customise system fields:
| 1. | You can change the heading text displayed for a system field by editing the text in the Custom Name column. |
| 2. | The system fields are either visible or invisible on the Profile page, depending on whether the Visible box is checked. |
| ▪ | If you uncheck this box, the field will not appear on the Profile page. You may want to do this to remove any fields that are not relevant to your mentoring programme. |
| ▪ | If you check this box, the field will appear on the Profile page in a pre-defined position. It is not possible to change the position of the field. |
| 3. | Use the Customisable check box to determine whether or not users are allowed to choose whether to set a field to public or private on their own profiles. For example, if the administrator wants to ensure that a field is visible to everyone, he would leave this box unchecked and set the Default Access Level to public. |
| 4. | Use the Default Access Level drop-down to indicate whether the information entered in this field should be visible to the Public (i.e. anyone who looks at the Profile page) or Private (visible only to the user). |
| 5. | Use the On Registration box to indicate whether or not the field is available for completion when a user registers on the system for the first time. |
| 6. | Once you have completed your changes, click Submit. |
To create/edit custom fields:
| 1. | To add a new custom field, click Create at the top-right of the screen: |
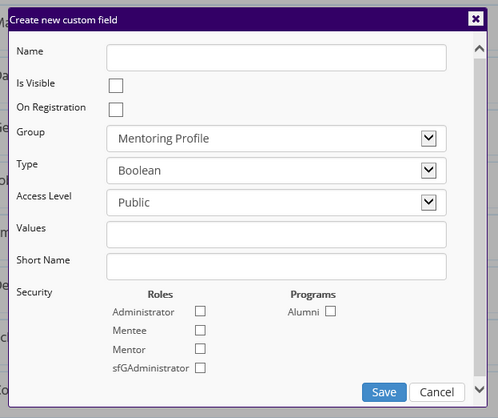
| 2. | In the Name field, type the heading that you want displayed on the Profile page. |
| 3. | In the Is Visible field, specify whether you want this field to be visible on users' profile screens. (Making it invisible is a quick way of hiding a field without deleting it completely). |
| 4. | In the On Registration field, specify whether you want this field to be available to new users as part of the self-registration process. |
| 5. | In the Group field, choose which grouping this field should appear in on the User Profile page (e.g under the "Mentoring Profile" group or the "User Profile" group). Typically, you would put short fields like gender or job title under "User Profile" and longer fields, like "Why do you want to be a mentor", under the "Mentoring Profile" group. |
| 6. | In the Type field, select the appropriate option as follows: |
| ▪ | Boolean - this will define the new field as a tick box. It will appear on the Profile page as follows: |
| ▪ | smalltext - this will define the new field as a text field with a fixed, short width. It will appear on the Profile page as follows: |
| ▪ | bigtext - this will define the new field as a text field that is designed to hold multiple lines and paragraphs of text. It will appear on the Profile page as follows: |
| ▪ | dropdown - this will define the new field as a drop-down list, from which the user will select one option. The values available to the user are defined in the Values field - see below. It will appear on the Profile page as follows: |
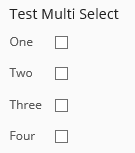
| ▪ | multiselectcheck - this will define the new field as a series of checkboxes, from which the user may select one or more options. The values available to the user are defined in the Values field - see below. It will appear on the Profile page as follows: |

| 7. | Use the Access Level field to indicate whether the information entered in this field should be visible to the Public (i.e. anyone who looks at the Profile page) or Private (visible only to the user). |
| 8. | Enter in the Values box the list of options to be displayed in the dropdown and multiselect types. Separate with commas the values to be displayed. Tip - if you want the first (and therefore default) option to be blank, then start your list with a comma: |
![]()
| 9. | The Short Name is a shortened version of the full Name - this is used by the system in various places and must be less than 128 characters. |
| 10. | Use the Security options to specify which users and which sub-programmes have access to this field. Using these security options allows you to have different profile fields for mentors and mentees, and different profile fields for different sub-programmes. |
| 11. | Once you have completed your changes, click Save. |
Notes:
| ▪ | The order in which the fields appear on the Profile page is defined by the order in which they are created when customising the form. You can change the order by dragging and dropping the fields up and down on the Profile Customisation screen. |
| ▪ | To edit a custom field once it has been created, click the |
| ▪ | To delete a custom field, click the |